QR코드 스캐너 구현에 대해서 알아보자.
우선 build.gradle 모듈에 들어가서 QR코드 컴파일옵션과 QR코드 라이브러리를 작성하여 sync now를 한다.

코드는 다음과 같다.
    // QRCODE compileOptions
    compileOptions{
        sourceCompatibility= 1.
        targetCompatibility= 1.8

    }


    // QRCODE 라이브러리
    implementation 'com.journeyapps:zxing-android-embedded:4.1.0'
    implementation 'com.google.zxing:core:3.4.0'
다음으로 mainfests -> AndroidManifest.xml에서 코드를 몇가지 작성해준다.
QR코드를 통해 정보를 webview로 도출시키기 위해 인터넷 권한을 허용한다. 이때, 웹뷰를 불러올 때 https를 만들어주기 위해 android:usesCleartextTraffic="true"를 작성한다.
코드는 다음과 같다.
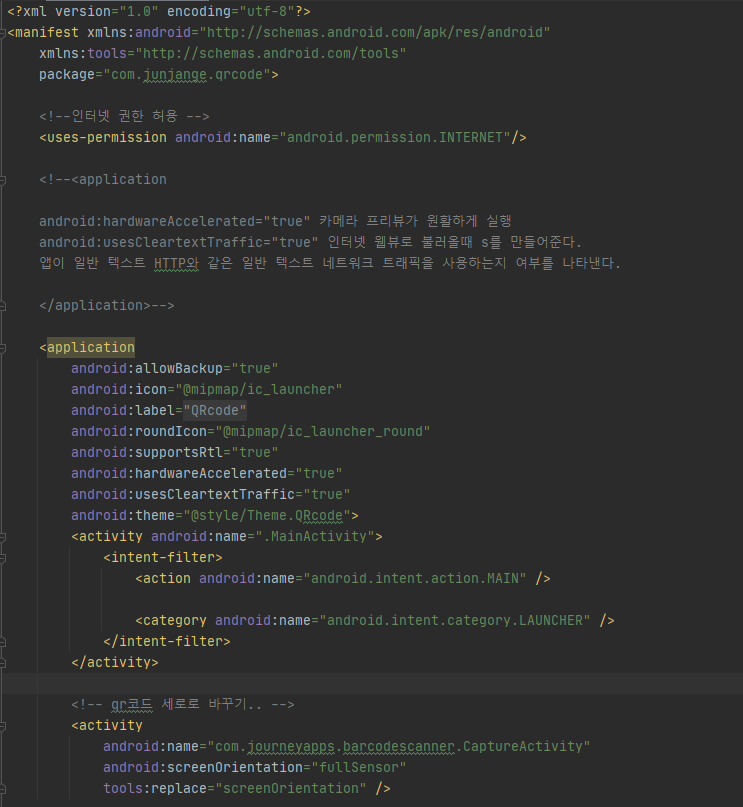
	<!--인터넷 권한 허용 -->
    <uses-permission android:name="android.permission.INTERNET"/>

    <application

    android:hardwareAccelerated="true" // 카메라 프리뷰가 원활하게 실행
    android:usesCleartextTraffic="true" // 인터넷 웹뷰로 불러올때 s를 만들어준다.
    // 앱이 일반 텍스트 HTTP와 같은 일반 텍스트 네트워크 트래픽을 사용하는지 여부를 나타낸다.

	 <!-- qr코드 세로로 바꾸기.. -->
        <activity
            android:name="com.journeyapps.barcodescanner.CaptureActivity"
            android:screenOrientation="fullSensor"
            tools:replace="screenOrientation" />

    </application>
다음으로 QR코드 버튼과 QR코드에 대한 정보를 나올 webview를 만든다.
layout -> activity_start.xml로 들어가 자신이 원하는 형태에 스플래시 스크린 화면을 만든다.
<?xml version="1.0" encoding="utf-8"?>
<LinearLayout
    xmlns:android="http://schemas.android.com/apk/res/android"
    xmlns:tools="http://schemas.android.com/tools"
    xmlns:app="http://schemas.android.com/apk/res-auto"
    android:layout_width="match_parent"
    android:layout_height="match_parent"
    android:orientation="vertical"
    tools:context=".MainActivity">


    <WebView
        android:id="@+id/web_view"
        android:layout_width="match_parent"
        android:layout_height="match_parent"
        android:layout_weight="1">

    </WebView>

    <Button
        android:id="@+id/button"
        android:layout_width="match_parent"
        android:layout_height="match_parent"
        android:layout_weight="11"
        android:text="QR당첨확인" />

</LinearLayout>
마지막으로 MainActivity에 코드를 작성한다.
import android.content.Intent
import androidx.appcompat.app.AppCompatActivity
import android.os.Bundle
import android.util.Log
import android.webkit.WebViewClient
import android.widget.Toast
import com.google.zxing.integration.android.IntentIntegrator
import kotlinx.android.synthetic.main.activity_main.*


class MainActivity : AppCompatActivity() {
    override fun onCreate(savedInstanceState: Bundle?) {
        super.onCreate(savedInstanceState)
        setContentView(R.layout.activity_main)


        // QR 코드 버튼 이벤트
        button.setOnClickListener {

            val integrator = IntentIntegrator(this)
            integrator.setDesiredBarcodeFormats(IntentIntegrator.QR_CODE) // 여러가지 바코드중에 특정 바코드 설정 가능
            integrator.setPrompt("QR 코드를 스캔하여 주세요:)") // 스캔할 때 하단의 문구
            integrator.setCameraId(0) // 0은 후면 카메라, 1은 전면 카메라
            integrator.setBeepEnabled(true) // 바코드를 인식했을 때 삑 소리유무
            integrator.setBarcodeImageEnabled(false) // 스캔 했을 때 스캔한 이미지 사용여부
            integrator.initiateScan() // 스캔

        }

    }

    override fun onActivityResult(requestCode: Int, resultCode: Int, data: Intent?) {

        // QR 코드를 찍은 결과를 변수에 담는다.
        val result = IntentIntegrator.parseActivityResult(requestCode, resultCode, data)
        Log.d("TTT", "QR 코드 체크")

        //결과가 있으면
        if (result != null) {
            // 컨텐츠가 없으면
            if (result.contents == null) {
                //토스트를 띄운다.
                Toast.makeText(this, "Cancelled", Toast.LENGTH_LONG).show()
            }
            // 컨텐츠가 있으면
            else {
                //토스트를 띄운다.
                Toast.makeText(this, "scanned" + result.contents, Toast.LENGTH_LONG).show()
                Log.d("TTT", "QR 코드 URL:${result.contents}")

                //웹뷰 설정
                web_view.settings.javaScriptEnabled = true
                web_view.webViewClient = WebViewClient()

                //웹뷰를 띄운다.
                web_view.loadUrl(result.contents)
            }
            // 결과가 없으면
        } else {
            super.onActivityResult(requestCode, resultCode, data)
        }
    }
}
여기까지 잘 따라 왔다면 다음 결과 화면과 같이 QR코드 스캐너를 사용할 수 있다.
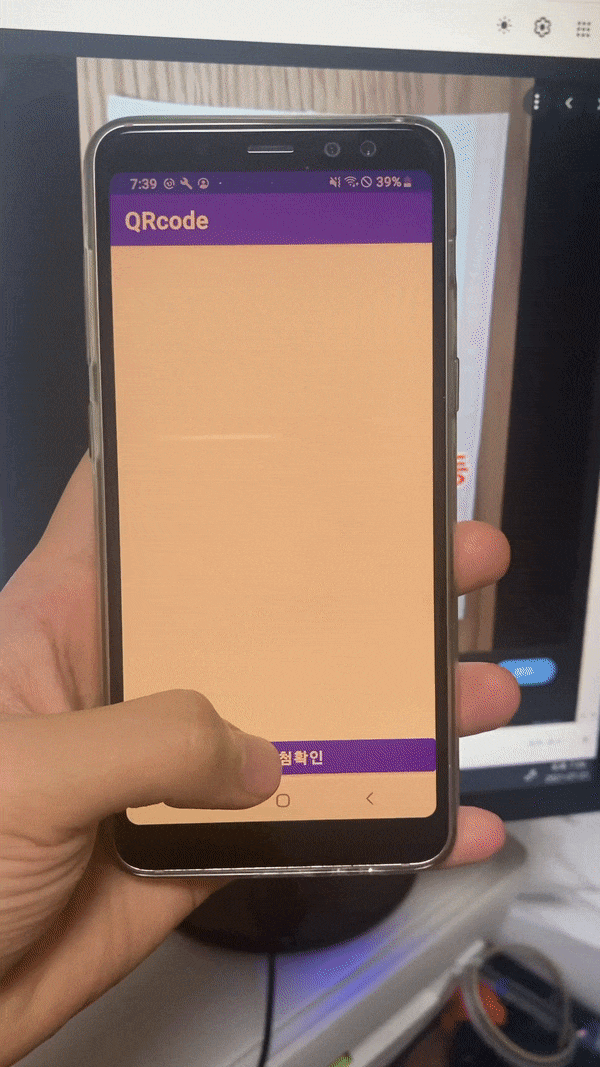
위 코드를 통해 복권 어플리케이션에서 QR코드를 통해 복권 당첨 확인을 하는 방법으로 활용할 수 있다.
Google Play
행운복권 - Google Play 앱
행운복권으로 일상 속에서 행운을 찾아보세요.
play.google.com
github
junjange/Kotlin-Learning
코틀린 학습. Contribute to junjange/Kotlin-Learning development by creating an account on GitHub.
github.com
'Develop > Kotlin' 카테고리의 다른 글
| [kotlin] 코틀린 Android Bottom Navigation Activity 뒤로가기시 앱 종료 (0) | 2021.07.24 |
|---|---|
| [kotlin] 코틀린 Android 네비게이션 바 아이콘 이름 고정 (0) | 2021.07.23 |
| [kotlin] 코틀린 스플래시 스크린(splash screen) 구현 (0) | 2021.07.03 |
| [kotlin] 코틀린 Fragment와 navigation bar 생성 (0) | 2021.02.07 |
| [kotlin] 코틀린 Activity와 Fragment의 생명주기(lifecycle) (0) | 2021.02.05 |