
| 일 | 월 | 화 | 수 | 목 | 금 | 토 |
|---|---|---|---|---|---|---|
| 1 | 2 | 3 | ||||
| 4 | 5 | 6 | 7 | 8 | 9 | 10 |
| 11 | 12 | 13 | 14 | 15 | 16 | 17 |
| 18 | 19 | 20 | 21 | 22 | 23 | 24 |
| 25 | 26 | 27 | 28 | 29 | 30 | 31 |
- 백준
- Flutter
- GDSC
- 다트
- 소프티어
- kotlin
- Android
- DART
- 스위프트
- 파이썬
- 플러터
- SWIFT
- java
- MVVM
- aws
- 현대sw
- 알고리즘
- 코테
- 머신러닝
- 아마존 웹 서비스
- 개발
- VSCode
- 자바
- 프로그래머스
- baekjoon
- 코틀린
- 안드로이드
- softeer
- Python
- programers
- Today
- Total
조준장 개발자 생존기
[kotlin] 코틀린 스플래시 스크린(splash screen) 구현 본문
스플래시 스크린이란 프로그램을 시작했을 때, 로딩 중에 표시되는 대형 이미지를 말한다. 어플리케이션의 로고, 앱에 대한 소개, 혹은 로딩 진행률 등을 애니메이션을 표시해주기도 한다.
코틀린에서 스플래시 스크린 구현에 대해서 알아보도록 해보자.
우선 새로운 Activity를 만든다.
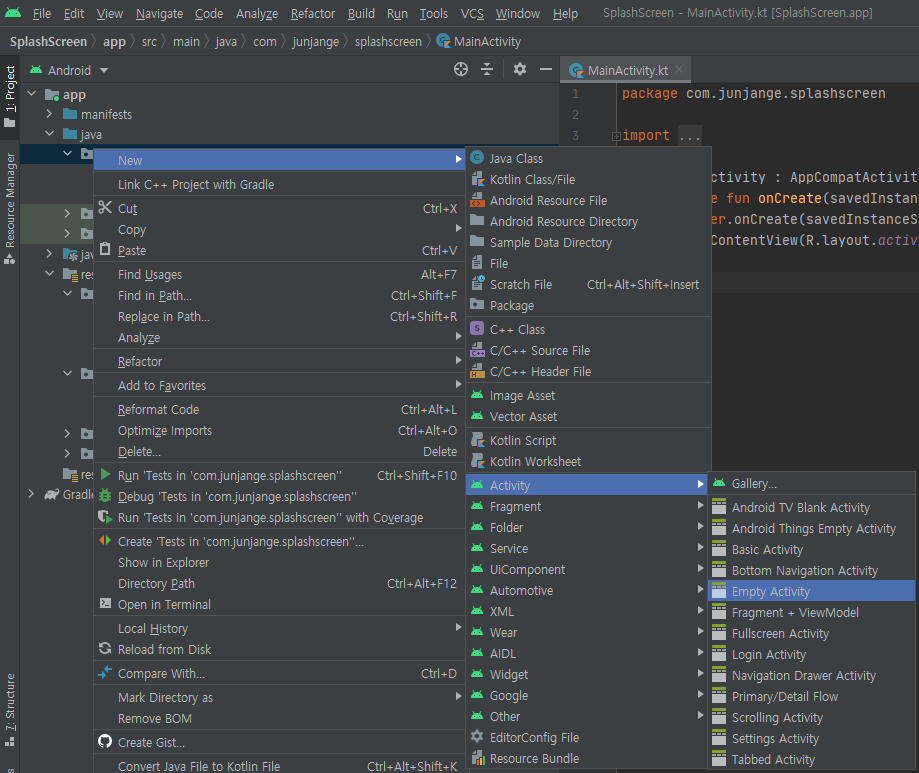
New -> Activity -> Empty Activity 클릭하여 Activity 이름을 설정하여 생성해준다.
생성한 Activity에 다음 코드를 주석을 확인하면서 작성한다.
import android.content.Intent
import android.os.Bundle
import android.os.Handler
import android.os.Looper
import androidx.appcompat.app.AppCompatActivity

class StartActivity : AppCompatActivity() {
    override fun onCreate(savedInstanceState: Bundle?) {
        super.onCreate(savedInstanceState)
        setContentView(R.layout.activity_start)

        // 일정 시간 지연 이후 실행하기 위한 코드
        Handler(Looper.getMainLooper()).postDelayed({

            // 일정 시간이 지나면 MainActivity로 이동
            val intent= Intent( this,MainActivity::class.java)
            startActivity(intent)

            // 이전 키를 눌렀을 때 스플래스 스크린 화면으로 이동을 방지하기 위해
            // 이동한 다음 사용안함으로 finish 처리
            finish()

        }, 500) // 시간 0.5초 이후 실행
    }
}
다음으로 스플래시 스크린 화면에 어떠한 이미지를 나오게 할지 설정해보자.
layout -> activity_start.xml로 들어가 자신이 원하는 형태에 스플래시 스크린 화면을 만든다.
<?xml version="1.0" encoding="utf-8"?>
<FrameLayout
    xmlns:android="http://schemas.android.com/apk/res/android"
    xmlns:app="http://schemas.android.com/apk/res-auto"
    xmlns:tools="http://schemas.android.com/tools"
    android:layout_width="match_parent"
    android:layout_height="match_parent"
    android:orientation="vertical"
    tools:context=".StartActivity">

    <ImageView
        android:layout_width="wrap_content"
        android:layout_height="100dp"
        android:layout_gravity="center"
        app:srcCompat="@drawable/start_up" />


</FrameLayout>
이제 마지막으로 스플래시 스크린 화면을 맨 처음에 나오게 설정해야 한다.
mainfests -> AndroidMainfest.xml
<?xml version="1.0" encoding="utf-8"?>
<manifest xmlns:android="http://schemas.android.com/apk/res/android"
    package="com.junjange.splashscreen">

    <application
        android:allowBackup="true"
        android:icon="@mipmap/ic_launcher"
        android:label="@string/app_name"
        android:roundIcon="@mipmap/ic_launcher_round"
        android:supportsRtl="true"
        android:theme="@style/Theme.SplashScreen">

        <!--  처음 시작하는 화면을 설정 -->
        <!--  android:theme="@style/Theme.Design.Light.NoActionBar" 액션바 제거 -->
        <activity
            android:name=".StartActivity"
            android:theme="@style/Theme.Design.Light.NoActionBar" >
            <intent-filter>
                <action android:name="android.intent.action.MAIN" />
                <category android:name="android.intent.category.LAUNCHER" />
            </intent-filter>
        </activity>


        <activity android:name=".MainActivity" />
    </application>

</manifest>
<activity 안에 적혀있는 activity가 처음에 화면을 켰을 때 구동되는 activity가 된다. 스플래시 스크린에는 액션바가 없어야 하기 때문에 android:theme="@style/Theme.Design.Light.NoActionBar" 코드를 작성하여 액션바를 제거해준다.
여기까지 잘 따라왔다면 Run버튼을 눌러 결과 화면을 확인한다. ( 밑에 사진 클릭해서 확인)
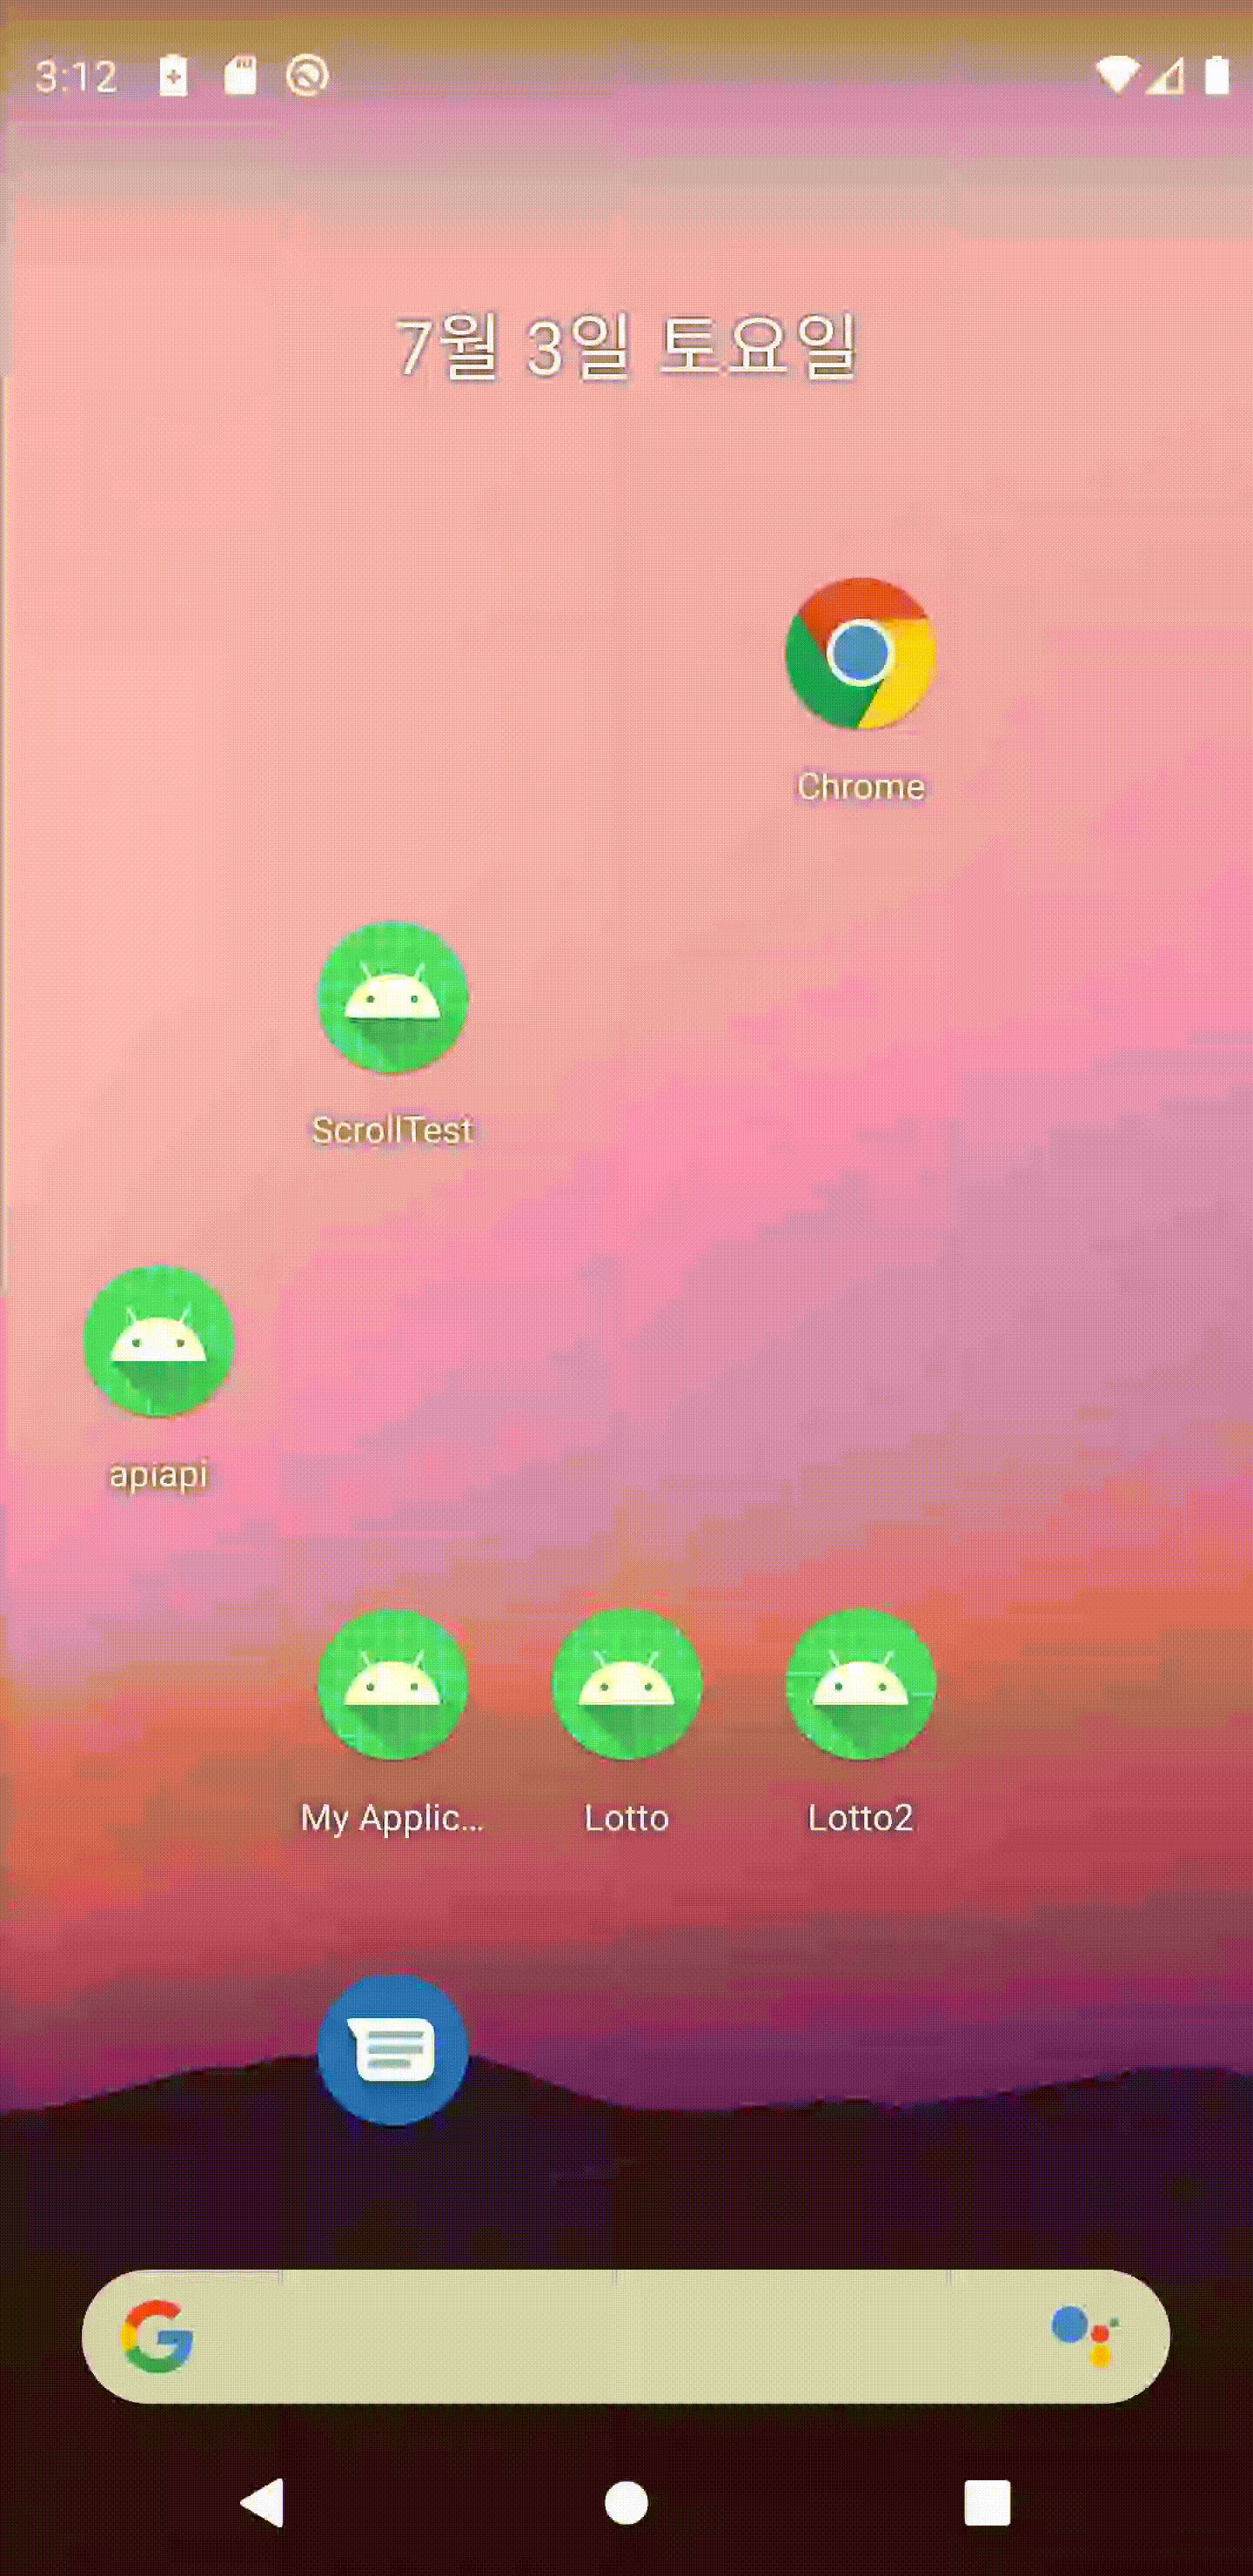
위 결과 화면과 같이 스플래시 스크린이 나오는 것을 알 수 있다.
github
junjange/Kotlin-Learning
코틀린 학습. Contribute to junjange/Kotlin-Learning development by creating an account on GitHub.
github.com
'Develop > Kotlin' 카테고리의 다른 글
| [kotlin] 코틀린 Android 네비게이션 바 아이콘 이름 고정 (0) | 2021.07.23 |
|---|---|
| [kotlin] 코틀린 QR코드 스캐너 구현 (0) | 2021.07.03 |
| [kotlin] 코틀린 Fragment와 navigation bar 생성 (0) | 2021.02.07 |
| [kotlin] 코틀린 Activity와 Fragment의 생명주기(lifecycle) (0) | 2021.02.05 |
| [kotlin] 코틀린 반복문(for, while, do -while) (0) | 2021.02.02 |


